← Home · In-Situ Testing

Field Density Testing – Sand Cone Method in Whangarei

Together, we solve the challenges of tomorrow.

LEARN MORE →

Whangarei's geology shifts fast: basalt flows from the Parahaki and Maunu scoria cones sit right next to soft alluvial silts along the Hatea River, and weathered Waitemata Group sandstone underlies much of the city basin. When a compactor rolls over these mixed materials, the achieved density can vary more than the contractor expects. Our lab team runs the sand cone field density test across Northland to verify that compaction meets the spec before the next lift goes down. In the Whangarei CBD rebuild area and out at the Marsden Point extension, we couple this with CPT testing when the sand cone becomes impractical below 300 mm depth, and we review results against grain size distribution to confirm whether the fill itself matches the laboratory compaction curve.

A density ratio of 98% on a lab curve means nothing if the fill material on site has changed — we check both in the same shift.

Methodology and scope

The kit we deploy around Whangarei is built around the standard sand cone apparatus: a graduated 4-litre plastic jar mounted on a brass cone valve, paired with a machined base plate. The operator pours clean, dry, single-sized Ottawa sand through the valve into the test hole, measuring the volume displaced to calculate in-place wet density. A microwave or gas burner on the truck gives us a rapid moisture content reading within 20 minutes, so the dry density ratio is available before the crew breaks for smoko. One practical detail that matters in Northland is sand calibration: humidity from the harbour basin can add half a percent moisture to the cone sand on a damp morning, shifting the unit weight enough to knock a marginal result below 95% of maximum dry density. We re-check the sand calibration at least twice a day on Whangarei sites, following NZS 4402:1986 methods, and we often reference the plate load test for a direct modulus value on structural fill pads where density alone doesn't tell the full story.
Field Density Testing – Sand Cone Method in Whangarei
Technical reference image — Whangarei

Local geotechnical context

Northland's subtropical climate turns a routine compaction test into a race against the weather. A cloudburst over the Maunu hills can saturate a freshly scarified lift in ten minutes, pushing the moisture content well past optimum and making the required density unachievable without reworking. In the warmer months, rapid surface drying of clayey silts forms a crust that masks a wet, under-compacted layer underneath — the sand cone method catches this because the hole goes through the crust. On the volcanic scoria common in Tikipunga and Kamo subdivisions, the open-void structure of the aggregate means some particles will crush under a heavy roller, shifting the grading curve and the lab's reference density. We flag this early by running a check on the Atterberg limits of the fines fraction and comparing with the earthworks specification before rejecting a result.

Need a geotechnical assessment?

Reply within 24h.

Email: [email protected]

Typical values

ParameterTypical value
Test standardNZS 4402:1986 Test 5.2 (Sand Cone Method)
Maximum test depth150–200 mm per lift (single-layer compaction)
Density metric reportedWet density, dry density, % relative compaction
Moisture determinationMicrowave/gas burner rapid method (NZS 4402 Test 2.2)
Typical fill materials testedVolcanic scoria, weathered sandstone, GAP 65, alluvial clayey silt
Calibration frequencyStart of day + mid-shift minimum; more if humidity changes >15%
Result turnaround on site20–30 minutes per test (density + moisture)

Other technical services

01

Standard compaction control (sand cone)

Routine density testing per lift on residential and commercial earthworks, road subgrade, and trench backfill. Includes moisture content, compaction curve comparison, and a site report within the same working day.

02

Nuclear gauge substitution and correlation

On large Whangarei subdivisions where nuclear gauge use requires extra compliance, we provide sand cone correlation panels: paired tests at the same location to build a site-specific density model for the contractor's gauge, reducing future testing time without sacrificing accuracy.

Regulatory framework

NZS 4402:1986 – Methods of testing soils for civil engineering purposes (Test 5.2: Sand cone method), NZS 4431:1989 – Code of practice for earth fill for residential development, NZGS Guideline on Earthworks in Volcanic Soils (Northland region), TNZ F/1:1997 – Specification for earthworks construction (Waka Kotahi)

Questions and answers

How much does a sand cone density test cost in Whangarei?

For projects within the Whangarei urban area and out to Kamo, Onerahi, and Tikipunga, a single sand cone test typically runs between NZ$150 and NZ$250 per point, depending on the number of tests booked and travel distance to the site. A morning of five to eight tests on one subdivision brings the per-test cost down noticeably.

How many tests do I need per lift on a residential section?

The Whangarei District Council usually requires a minimum of one test per 200 m² per compacted lift, with at least three tests per layer regardless of area. For trench backfill under services, one test per 20 linear metres is common. We confirm the exact frequency against your consent conditions before starting.

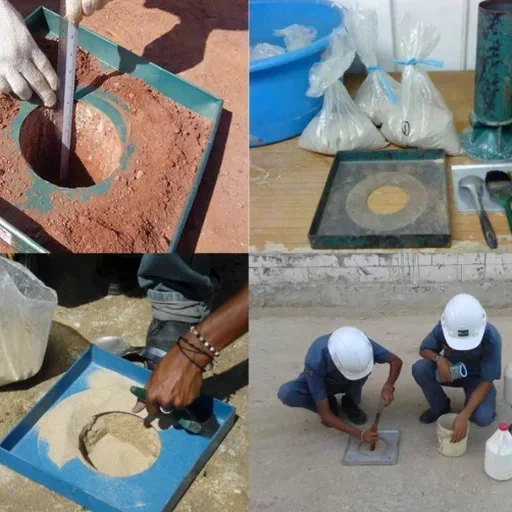
Can you test through coarse scoria or large aggregate?

The sand cone method works best with particles up to about 20 mm. On Whangarei's coarse scoria fills where the maximum particle size exceeds that, we enlarge the test hole and use a replacement sand with a calibrated unit weight suited to the larger volume. If the aggregate is too open-graded for a reliable sand cone, we discuss switching to a plate load test for modulus-based acceptance.

What happens if the test fails the compaction spec?

We give you the numbers on the spot: wet density, moisture content, and the dry density ratio against the lab curve. If it's under spec, we flag the likely cause — moisture too high, lift too thick, or roller passes insufficient — so the earthworks crew can rework the layer. We'll retest after recompaction, and we keep the paperwork chain ready for the engineer's sign-off.

Location and service area

We serve projects in Whangarei and surrounding areas.

View larger map